Image Channels
A list of channels for the image is shown when you open a dataset. Each channel is represented by a color displayed both on the image and next to the channel name.
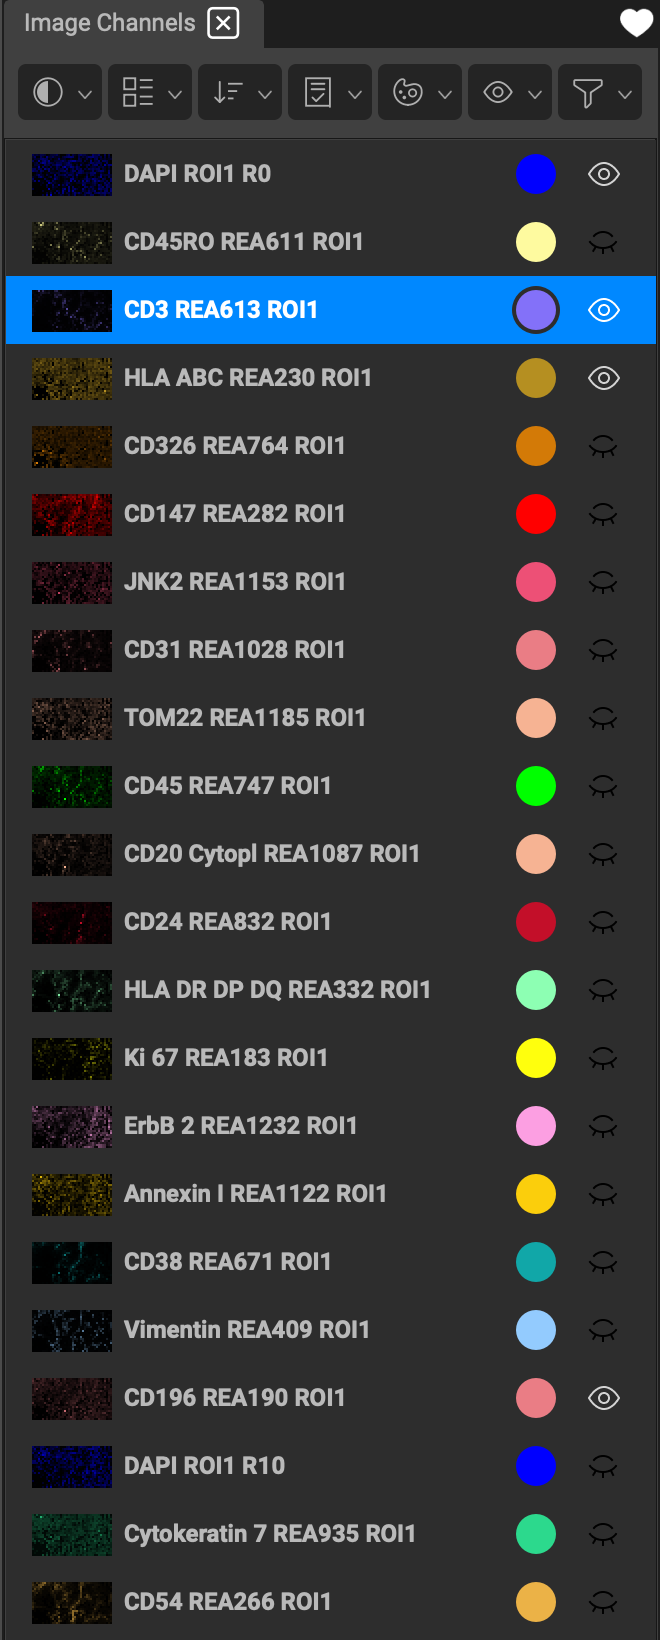
The 👁 icon indicates visibility of a channel. Turn on channels in the list by enabling the eyeball. This allows for any number of combinations of channels to be on simultaneously. It is important to have an appropriate number (~ 3-5) of channels displayed on the image at once, so as not to hinder your ability to distinguish between them. Too many colors overlapping on the same location will wash the display out to white.
Channel Right-Click Options
Right-clicking on a channel reveals a number of actions that you can apply to the selected channel.
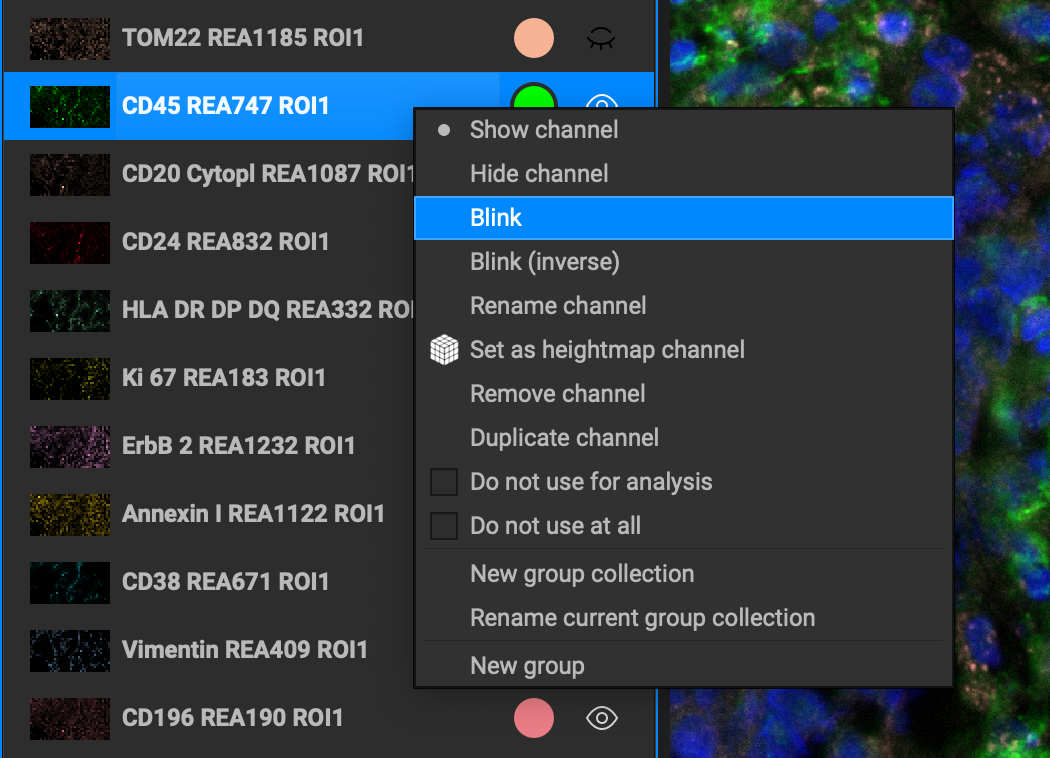
Rename a channel by typing into the input field. You can also double-click on the biomarker channel to rename it.
Hide / show channel toggles the channel on or off (like the 👁).
Blink gives the blink effect to the active channel with the first two time interval checkboxes selected
Blink (Inverse) gives the blink effect to the active channel with the last two time interval checkboxes selected
Set as heightmap channel makes it the active heightmap channel in 3D view mode.
Remove channel deletes it from the channels list.
Duplicate channel makes an identical copy of the channel in the list.
Do not use for analysis will not include the channel from any part of the analysis workflow.
Do not use at all will ommit this channel from any display, processing, or analysis function.
Move to group places the channel into a specified existing group.
New group collection allows you to group existing groups together as a collection.
Rename current group collection allows you to rename the current group collection.
New group let's you create a group to move channels to.
Color Palette
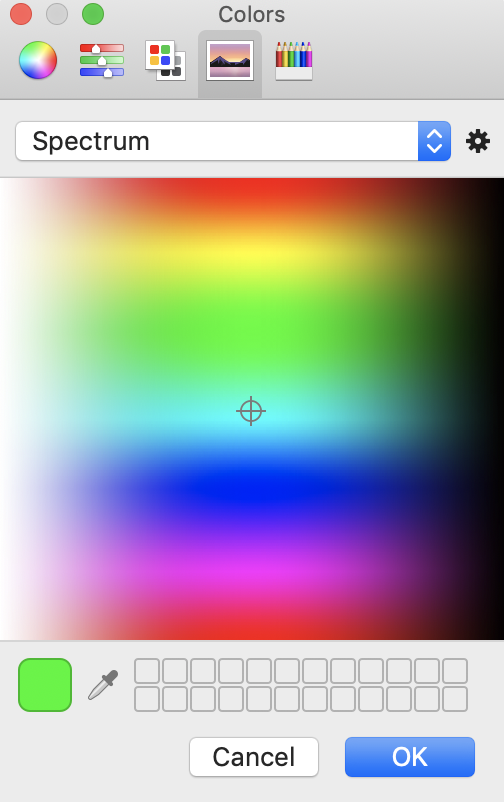
The color for a channel can be adjusted by clicking on the colored circle next to the channel name. This will open a color palette users can customize or select from a list. Simply choose the color and click OK.
Channels List Icon Bar

At the top of the Channel list is an icon bar with optimized functions that you can apply to the entire list of channels at once. These include options for adjusting display settings, coloring and grouping channels, QA, and a Display Only channel toggle.
The icon bar's functions are detailed below.
Color Scheme Presets
QiTissue preset color schemes can be applied to the entire list of channels by clicking on the red, green, and blue icon and selecting from the dropdown.
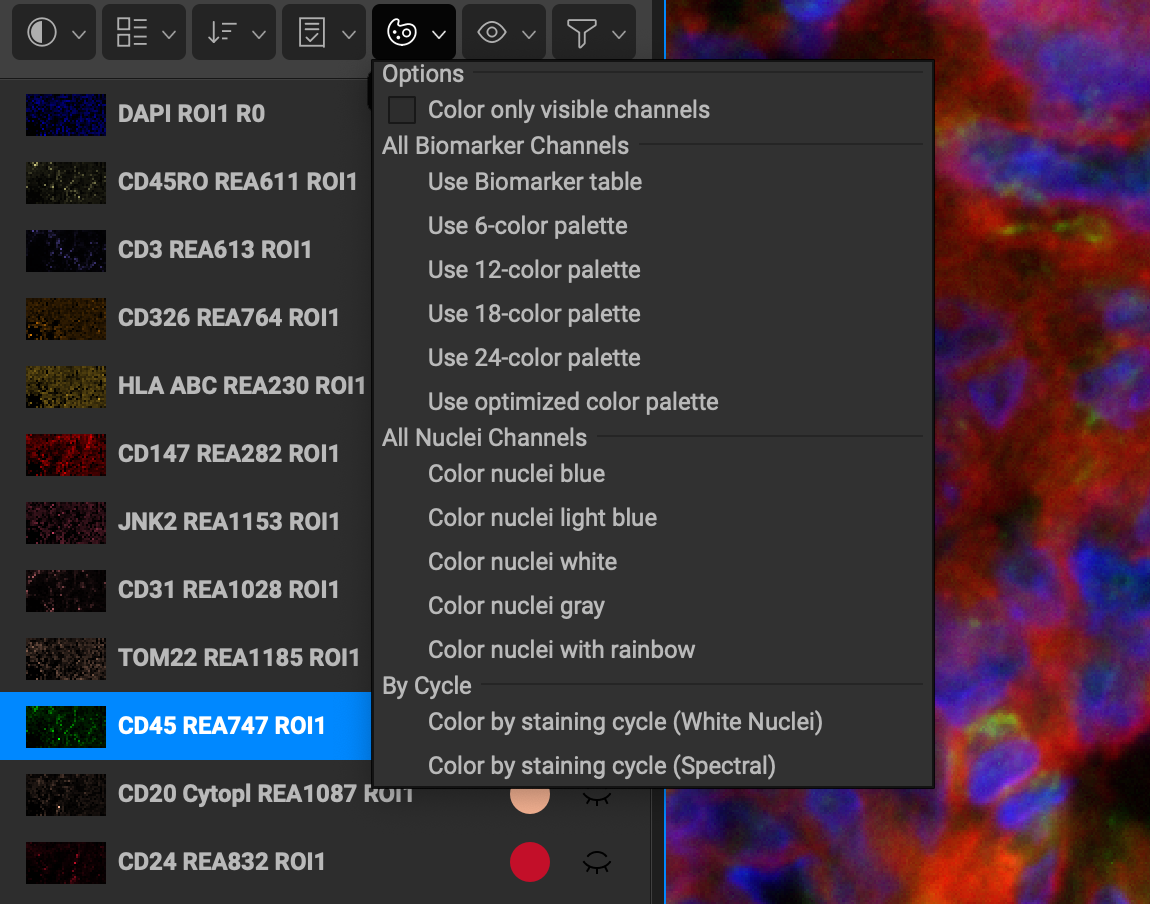
The following are the list of colorizing options:
Color only visible channels checkbox will apply preset color schemes only to the channels that are toggled on.
Use Biomarker table is active by default. You can preset the color that loads for each biomarker by going to the Biomarker Reference window and adjusting the display color for that marker under the Analysis tab.
Use 6-color palette applies a range of 6 colors to all of the channels in the list (if there are more channels than colors in the chosen palette, the colors will repeat in order down the remainder of the list).
Use 12-color palette applies a range of 12 colors to all of the channels in the list.
Use 18-color palette applies a range of 18 colors to all of the channels in the list.
Use 24-color palette applies a range of 24 colors to all of the channels in the list.
Use Optimized Color Palette counts the number of channels and divides the color spectrum and assigns colors evenly to each marker.
Color nuclei blue assigns all DAPI channels a dark blue color.
Color nuclei light blue assigns all DAPI channels an aqua blue color.
Color nuclei white assigns all DAPI channels a white color.
Color nuclei gray assigns all DAPI channels a gray color.
Color nuclei with rainbow assigns all DAPI channels a different color.
Color by staining cycle (White Nuclei) assigns each marker a different color, and repeats for each round. All DAPI are set to white.
Color by staining cycle (Spectral) assigns each marker with a color from the spectral palette and repeats for each round. All DAPI are set to dark blue.
Channel Grouping
The Group By dropdown list allows you to group channels together within the channels list under a preset or customized group name.
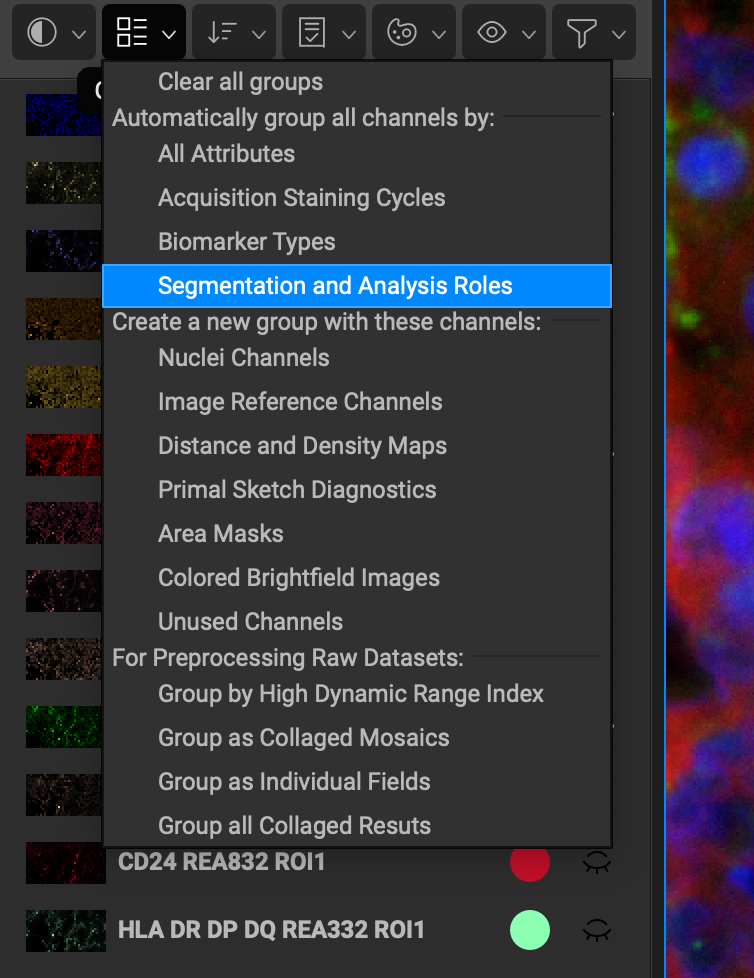
The following are the list of grouping options for computed or specified channels:
Group all Nuclei Channels moves all nuclei channels into a group named "Nuclear Markers."
Group all Image Reference Channels will move all computed autoflorescence channels into a group names "Auto flourescence."
Group Distance / Density Maps will group any computed distance or density maps into a group called "Distance and Density."
Group all Primal Sketch Diagnostics will group primal sketch images created during segmentation.
Group Area Masks
Group Colored Brightfield Images
Group Unused Channels will move all channels into a group named "Unused Channels" that have "Do not use at all" checked (found in the right-click option.)
The following are the list of grouping options for all channels:
Automatically Re-group All will place channels back into groups prior to clearing.
Group by Cycles groups creates a group for each round and places each channel into its respective cycle.
Group Collaged Fields
Group by Biomarker Type moves channels into their biomarker classification (which can be set in the Biomarker Reference window). These groups include: Nuclear Markers, Architecture, Cell State, Microenvironment, Cluster Differentiation, and Other.
Group by Segmentation and Analysis Roles moves channels into different groups based on their expected staining pattern. These groups include: Segment: Nuclear-Only Markers, Segment: Cell Surface Markers, Segment: Inter Cellular Markers, and Other Images to by Measured.
Group by High Dynamic Range Index.
Contrast Options
Adjust the contrast options for the entire Channels list.
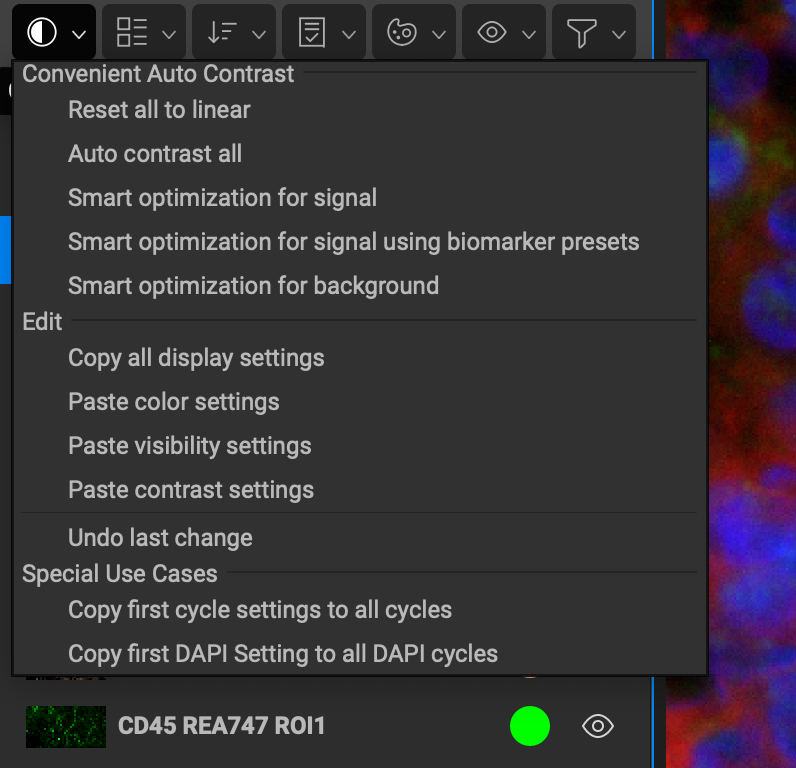
Reset all to linear creates a linear histogram plot in the data range.
Auto contrast all uses biomarker information to optimally display each channel.
Optimize all for signal reduces background noise for each channel.
Optimize all to show background strengthens background for each channel.
Copy all display settings copies the color and histogram display settings of every channel in the list.
Paste color settings applies any channel colors copied onto the active channels list.
Paste visibility settings applies any channel histogram display settings copied onto the active channels list.
Copy first cycle settings to all cycles will copy/paste channel display settings of first round channels to all other rounds.
Copy first DAPI Setting to all DAPI cycles will copy/paste channel display settings of R1 DAPI to all other DAPI channels.
Quality Analysis
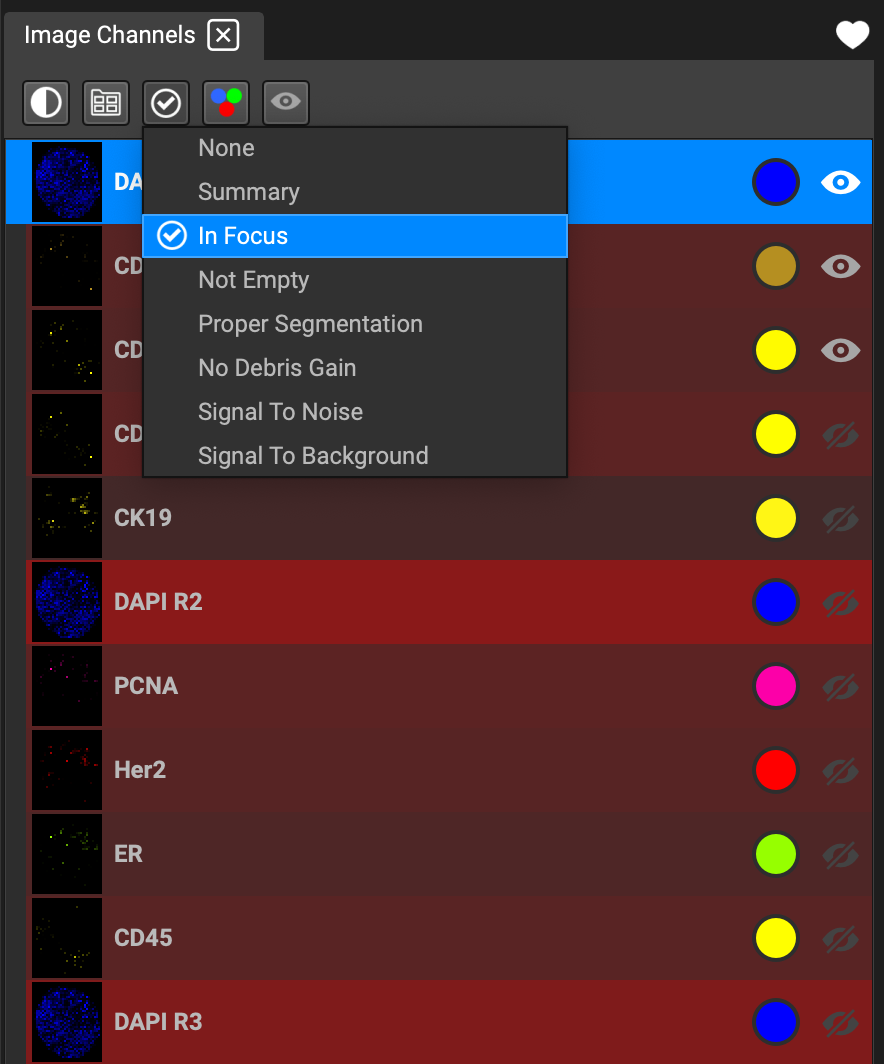
The QA dropdown list is an effective tool for identifying degradation during image acquisition. You can sort the channels in the list according to background signal, over exposure, etc. (*Work in progress.)
Channel Favorites
You can save a perspective by clicking on the heart icon and selecting Create new. This saves the combination of channels along with any display setting adjustments made to the channels. Simply name the perspective when prompted.
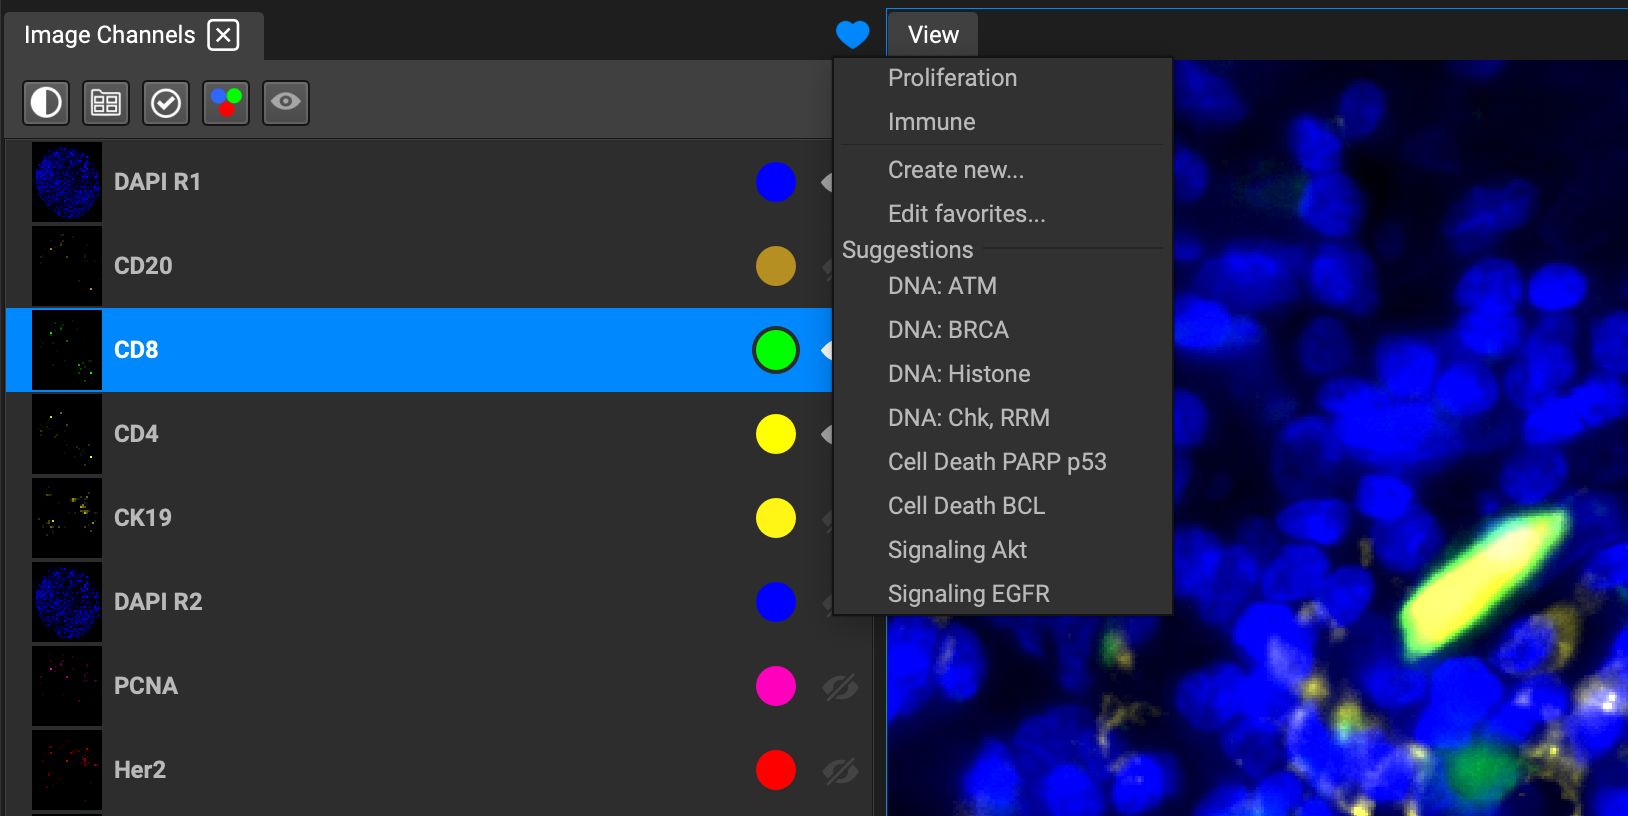
You can also select a suggested preset perspective and apply it to the image. QiTissue takes into account the biomarkers detected in the image and will suggest specific combinations based on what it finds under Suggestions. Any adjustments to these will not save, however, so you will need to create your own custom perspective by adding it through the dialog window.
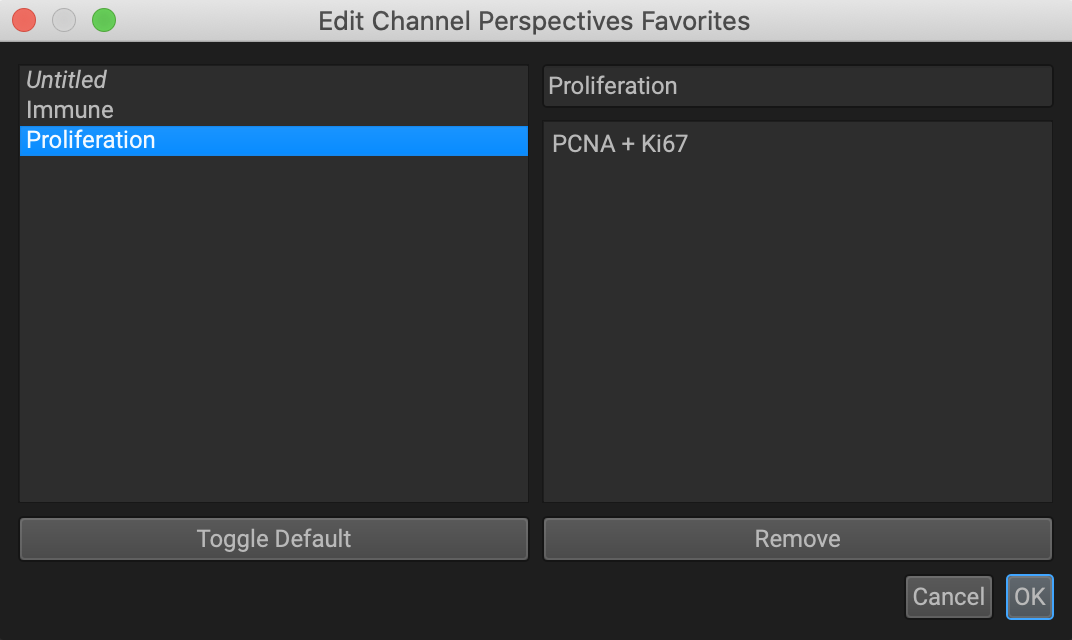
To update an existing perspective, select it from the favorites dropdown menu to make it active. Then click on the favorites dropdown again and select Update X.
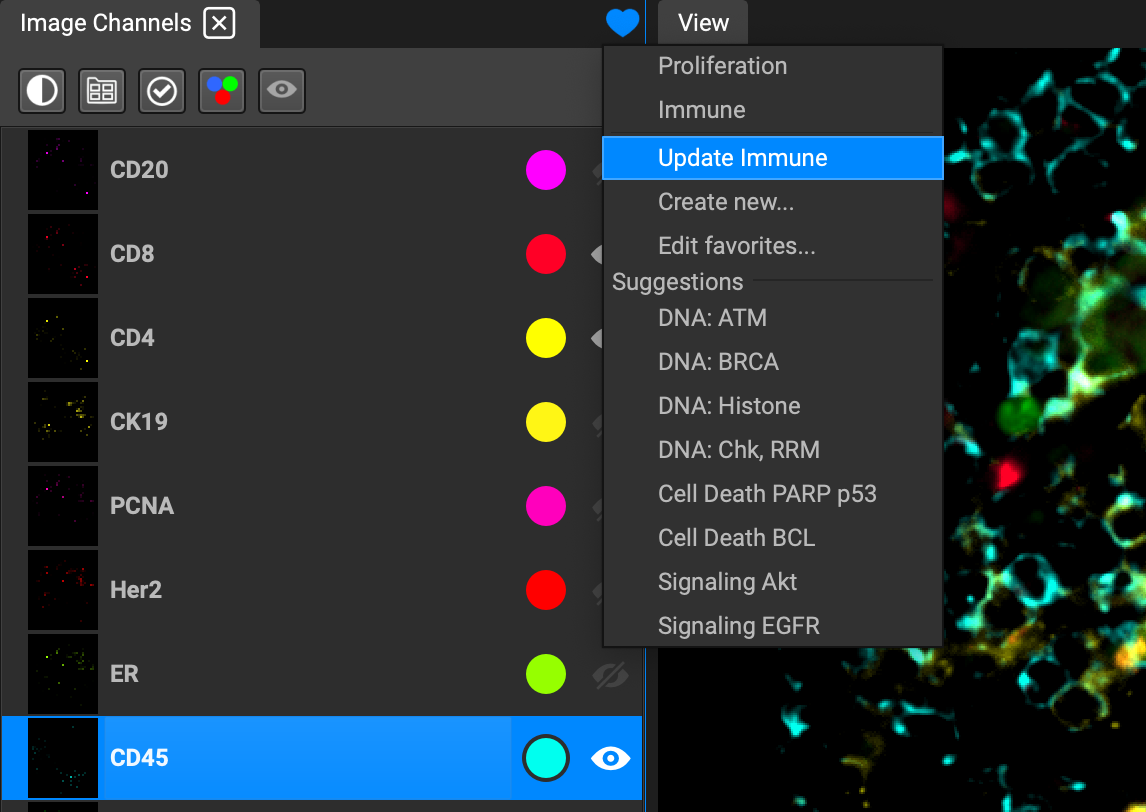
Favorited perspectives can be applied to other datasets you may open down the road, and will always appear at the top of the dropdown list.
Channel Table
You can also view the channel list by rounds. The Channel Table is an alternative to the Channel List, with all of the same functionality, including the same icon bar.
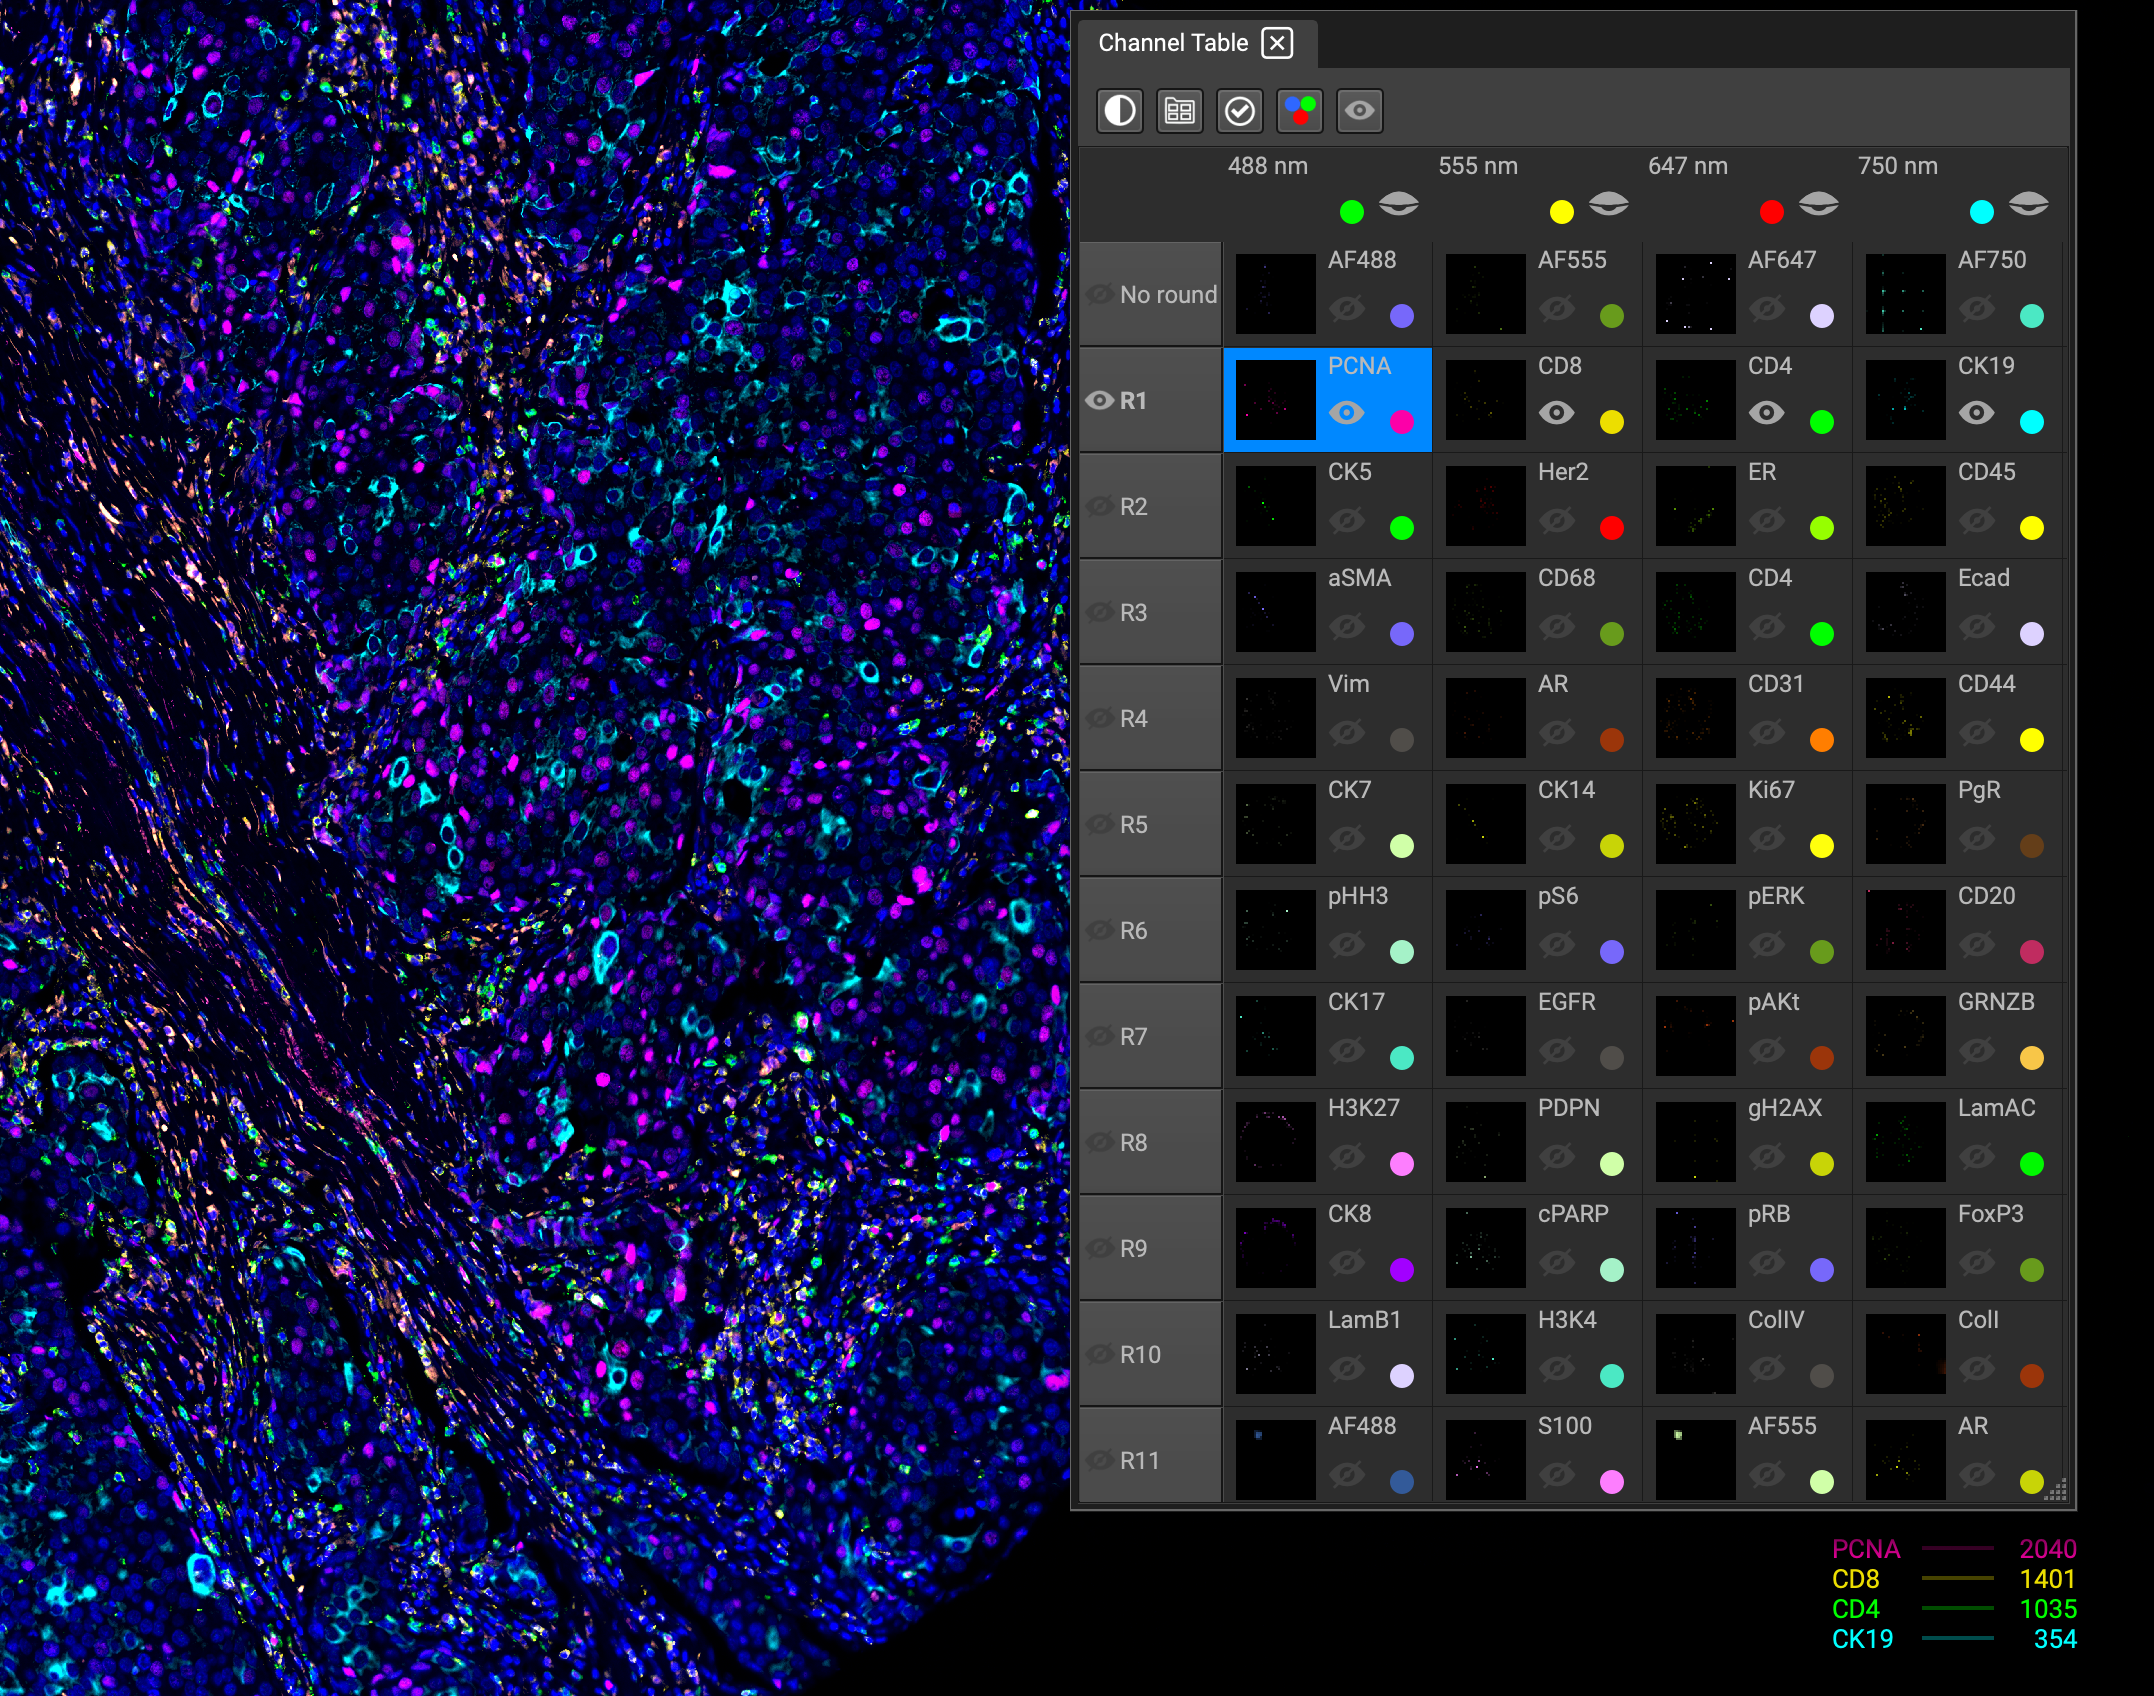
Similar to visualizing individual channels in the Image Channels list, each round can be toggled on and off by clicking the eyeball icon next to the round. This layout is optimal for identifying degradation, or signal strength and loss during image acquisition.

